Tutorial: OCEL Graph
This tutorial provides a general example for developing an Ocelescope plugin from scratch.
In this tutorial, we will build an OCEL Graph plugin inspired by the OCELGraph feature of the OCPQ tool.
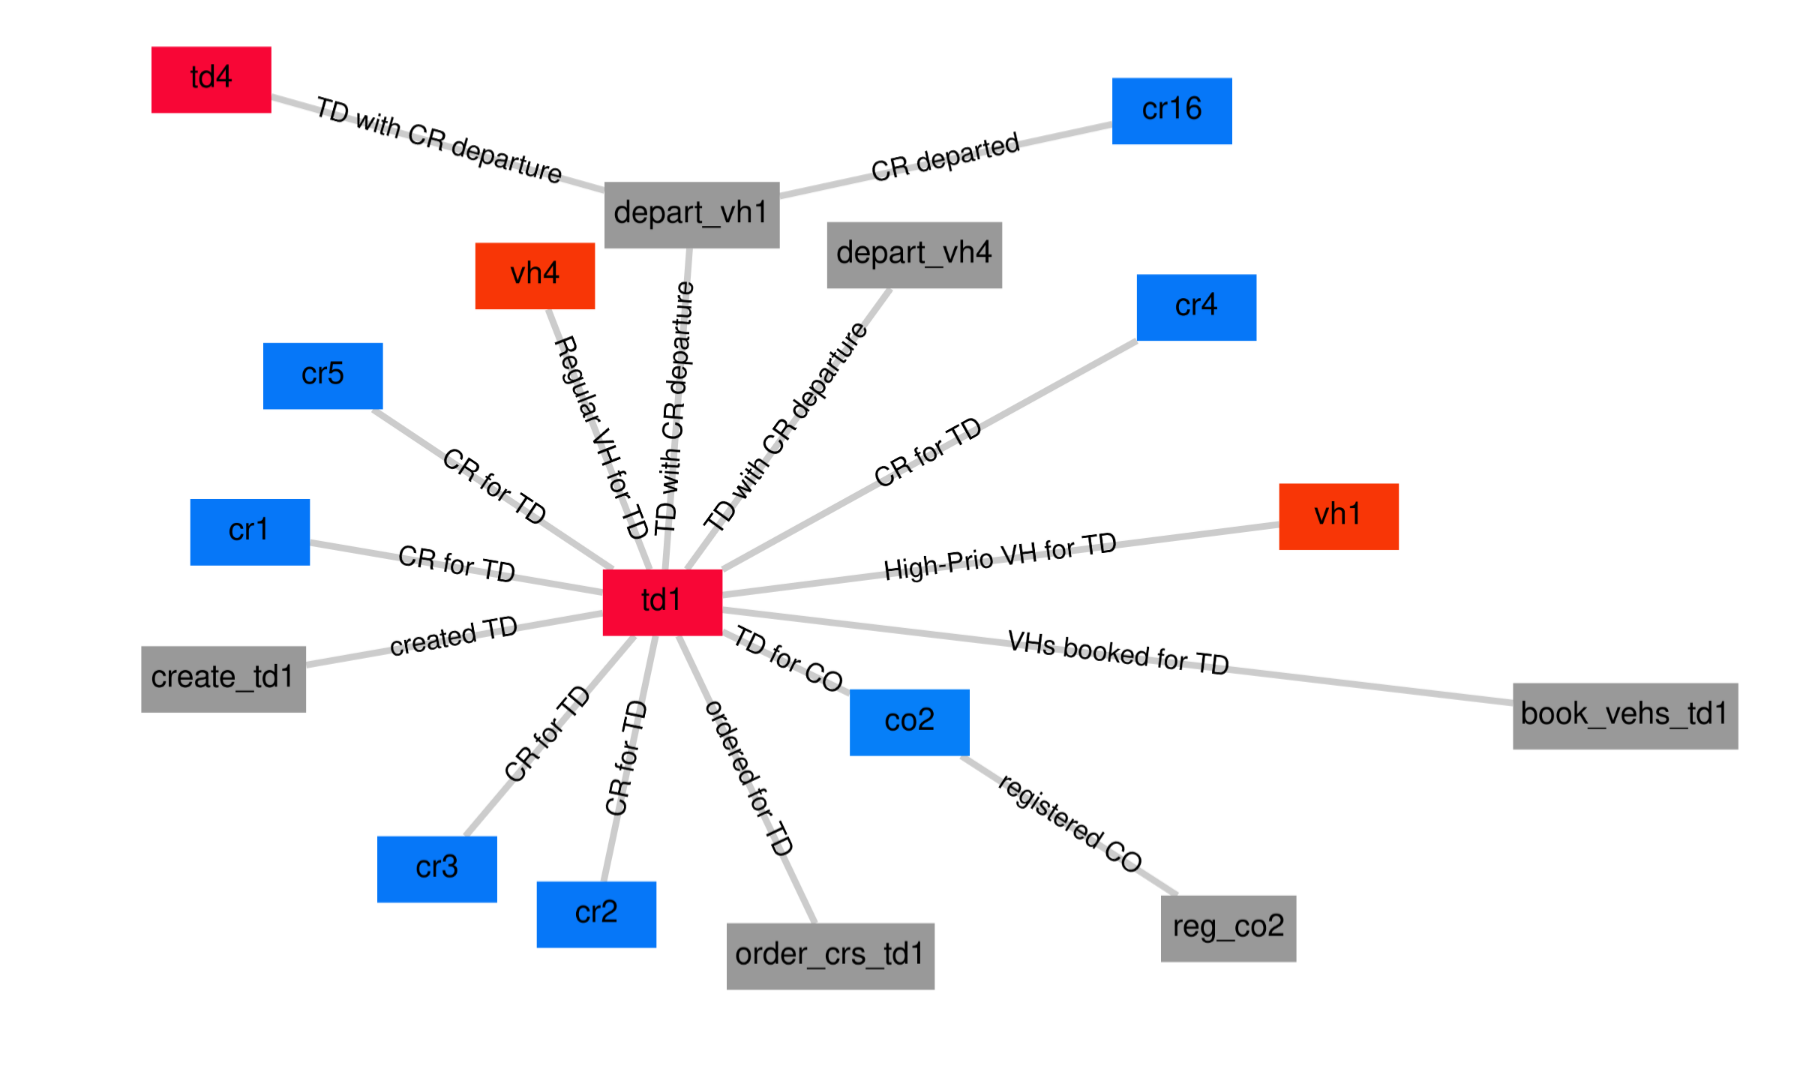
An OCEL graph visualizes how objects and events are related to each other. The plugin lets you choose an object or event ID as the starting point (the root), and then builds a spanning tree from that root based on the connected relationships in the ocel. You can also set how far the graph should expand from the starting point.
Try out OCELGraph
You can explore the source code in the repository below, or download the plugin and try it out yourself.
Requirements
This project requires Python 3.12 to be installed on your system. For easy and reproducible package management, we recommend using uv.
Step 1: Setup
To get started, we recommend using the official template for plugin development. You can quickly generate a new project using uvx, a tool from the uv project that allows you to run project generators like cookiecutter. To use the template with uvx, run:
Alternatively, you can clone the template repository directly:
Once you have your project set up, install all dependencies with:
If you prefer not to use uv or uvx, you can also use other Python package managers such as pip, pip-tools, or poetry to install dependencies. Simply reference the requirements.txt or pyproject.toml file included in the template. For example, with pip you can run:
If you used the template, you should already have a plugin set up with the necessary metadata, and your project structure should look like the following:
The template is designed as a minimal example, with the entire plugin logic contained in the plugin.py file. This makes it easy to get started and see how everything works in one place.
We highly recommend using Git for version control. If you haven’t already initialized a Git repository in your project, you can do so now with:
If you are using Git, the Cookiecutter template also sets up a pre-commit hook that will automatically format your code before each commit. To activate this hook, simply run:
or if you are using uv:
Step 2: Writing the Plugin
Writing Plugin Metadata
An Ocelescope plugin is defined by its Plugin Class. Let's start by adding some metadata to it.
If you created your project using the Cookiecutter template, this should already be set up for you. If not, open plugin.py, find the plugin class, and rename the class and its metadata to something like the following:
- The class name (OcelGraphDiscovery) is the unique name of your plugin and is used to distinguish it from other plugins.
- The label is what will be shown in the UI.
- The description briefly explains what your plugin does.
- The version field lets you update your plugin with new features or bug fixes over time.
Adding a Plugin Method
Now let’s start writing the actual script that processes an OCEL and generates an OCEL Graph.
Add a new method to your plugin class called mine_ocel_graph. Every plugin method should be decorated with @plugin_method, where you can specify a label and a description. These will be displayed in the frontend interface.
Defining Plugin Inputs
When writing a plugin method, it’s always important to think beforehand about its inputs and outputs. For our OCEL Graph plugin, we need the following inputs:
- ocel: The OCEL log to analyze.
- entity_id: An identifier for the root of the graph. This can be either an object ID or an event ID from the OCEL log.
- max_depth: The maximum depth to which the graph should be explored from the root entity.
- max_neighbours: The maximum number of neighbours to include at each step, to prevent the graph from growing too large and becoming unmanageable.
As an output, our method will return an OCEL graph. Since plugin methods in Ocelescope can only return either OCEL logs or resources, the OCEL graph must be implemented as a resource.
flowchart LR
subgraph inputs [Inputs]
OCEL["OCEL Log"]
EntityID["Entity ID<br/>(object or event ID)"]
MaxDepth["Max Depth"]
MaxNeighbours["Max Neighbours"]
end
Method["mine_ocel_graph()"]
subgraph outputs [Outputs]
OCELGraph["OCEL Graph<br/>(Resource)"]
end
inputs --> Method
Method --> outputs
EntityID -. references .-> OCELAdding an OCEL Input
Since our goal is to create an OCEL Graph, we need to have an OCEL log as one of the method inputs. This can be done by simply adding it as a parameter to the mine_ocel_graph method:
To make it easier for users in the frontend, you can give this input a prettier name and a helpful description. You do this by annotating the parameter with the OCELAnnotation class:
Now, in the frontend, users will see a friendly label and description when selecting the OCEL log input for your plugin.
Adding a Configuration Input
To make the OCEL Graph plugin interactive, we’ll define a configuration input class.
This allows users to add configuration parameters for the plugin method..
First, either add a new input class or rewrite the existing input class in your template.
Rename the class to OCELGraphInput to match your plugin.
Why frozen=True is important
Always set frozen=True when inheriting from PluginInput.
This makes your configuration input immutable, which is required by Ocelescope for proper validation and stability.
Now, extend your OCELGraphInput class to include configuration parameters for the maximum depth of the OCEL graph and the maximum number of neighbours per node.
Use Pydantic’s Field to set titles, descriptions, defaults, and constraints for these integer values.
To let users select the root entity of the OCEL graph, define two classes:
ObjectRootfor selecting an object by its IDEventRootfor selecting an event by its ID
Each class uses the OCEL_FIELD helper to link the field to the selected OCEL log, enabling autocomplete and validation in the UI.
These classes are then combined in your main input class using a union type (ObjectRoot | EventRoot):
Why use a union?
The union type allows users to select either an object or an event as the root entity of the OCEL graph, but not both at the same time. This creates a flexible input in the UI, where the user first chooses the entity type (object or event), and then provides the appropriate ID.
The Config class provides a user-friendly label for each option in the frontend.
The OCEL_FIELD helper ensures that the field will autocomplete with available IDs from the OCEL log chosen by the user.
Important
The ocel_id argument in OCEL_FIELD must exactly match the name of the OCEL parameter in your plugin method
(for example, ocel in def mine_ocel_graph(self, ocel: OCEL, ...)).
This ensures that the field is correctly linked to the user-selected OCEL log and will display the appropriate dropdown/autocomplete values.
The final code for your configuration input class looks like this:
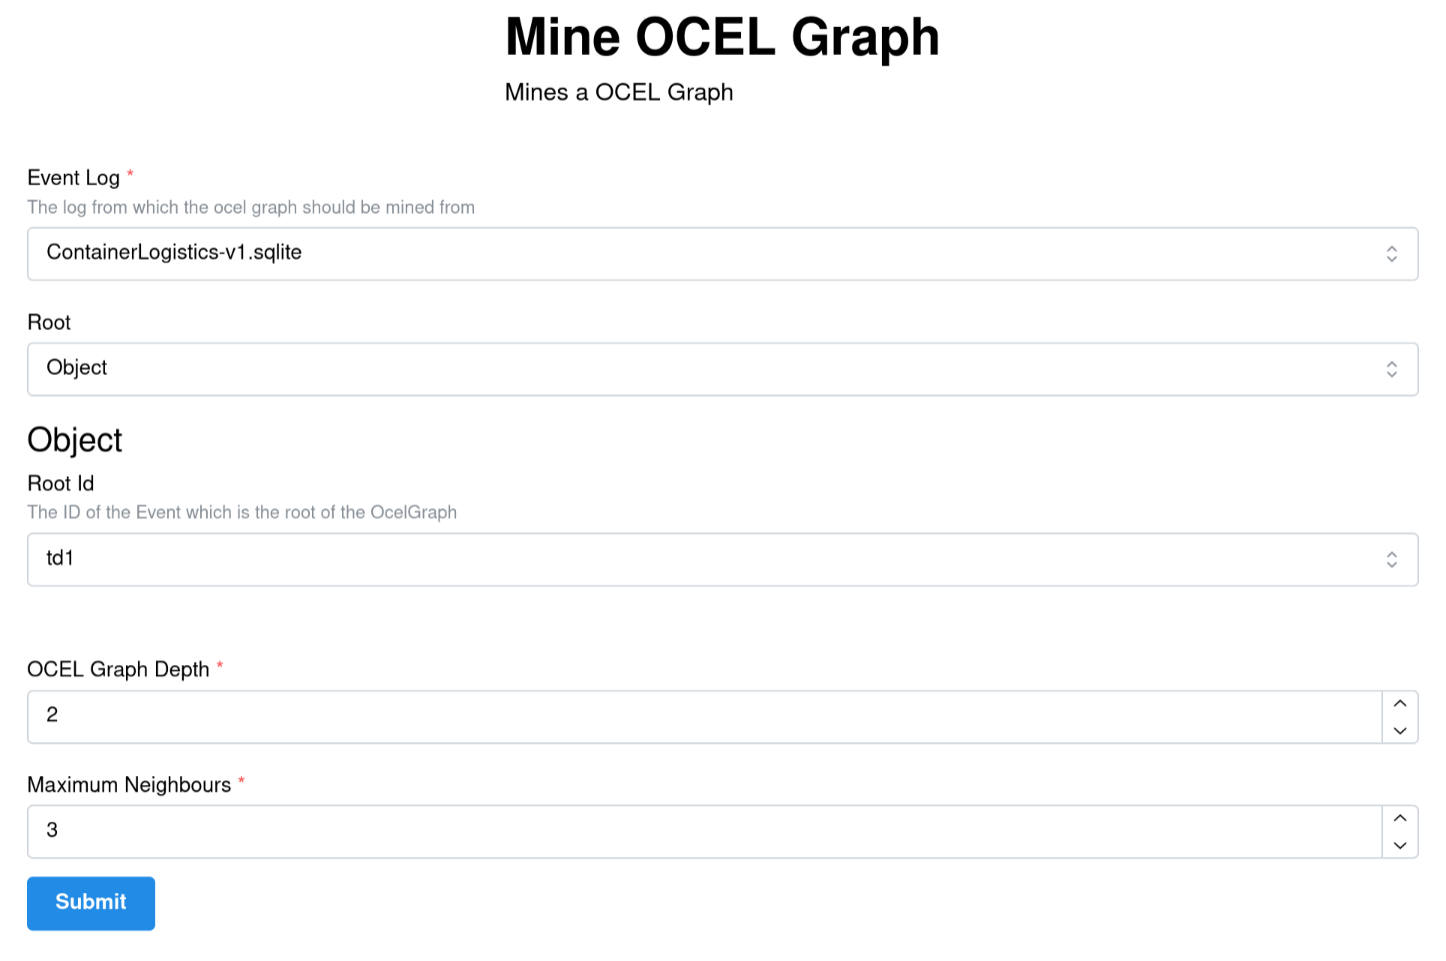
This code creates the following input form in the frontend:
Defining a Resource
We want to define a custom output—an OCEL Graph—which in Ocelescope is done by creating a Python class that inherits from the Resource class.
Important
All subclasses used as properties in your resource (such as EventNode, ObjectNode, Relation, O2ORelation, and E2ORelation) should inherit from Pydantic’s BaseModel.
This ensures that your data structures are compatible with Ocelescope’s validation and serialization.
You can also add a label and a description to your resource class, which helps the frontend display more user-friendly labels.
A resource can include any property that can be serialized to JSON—such as lists, strings, numbers, or other BaseModel classes.
You can also add any number of functions to work with the resource. For example, here’s how to get all event and object IDs inside the resource:
To tell Ocelescope that your method returns your OCELGraph, add it as a type hint in your plugin method:
Visualization
At this point, our OCELGraph class can already be used as a resource and returned as an output from your plugin method. However, by default, it is just a data structure without any built-in visualization.
To enable visualization in the Ocelescope frontend, you can extend your resource class by adding a visualize method.
A visualization function is a class method that returns a predefined visualization object (such as a Graph), and should include a type hint for clarity.
For example, you can add the following visualize method to your OCELGraph class:
With this method, your resource will not only provide the OCEL graph data, but also a built-in visualization for the Ocelescope frontend to display.
Implementing the Plugin Method
Now let's implement the method which transforms our input (the OCEL and configuration) and returns our resource. For the sake of this tutorial, we won’t discuss the implementation details. Instead, we’ll add the implementation in a utility file to keep the plugin method itself clean and readable.
For example, in your utility file (e.g., util.py):
Show mine_ocel_graph Implementation
| util.py | |
|---|---|
1 2 3 4 5 6 7 8 9 10 11 12 13 14 15 16 17 18 19 20 21 22 23 24 25 26 27 28 29 30 31 32 33 34 35 36 37 38 39 40 41 42 43 44 45 46 47 48 49 50 51 52 53 54 55 56 57 58 59 60 61 62 63 64 65 66 67 68 69 70 71 72 73 74 75 76 77 78 79 80 81 82 83 84 85 86 87 88 89 90 91 92 93 94 95 96 97 98 99 100 101 102 103 104 105 106 107 108 109 110 111 112 113 114 115 116 117 118 119 120 121 122 123 124 125 126 127 128 129 130 131 132 133 134 135 136 137 138 139 140 141 142 143 144 145 146 147 148 149 150 151 152 153 154 155 156 157 158 159 160 161 162 163 164 165 166 167 168 169 170 171 172 173 174 175 176 177 178 179 180 181 182 183 184 185 186 187 188 189 190 191 | |
In your plugin class, simply import and call this function:
Warning
Currently, Ocelescope plugins only support relative imports.
This means you must ensure all imports inside your plugin use relative paths.
Step 3: Build Plugin
Before your plugin can be built, make sure that the top-level __init__.py properly exposes your plugin class:
In ocelescope plugins are basically just the packages zipped so in our case:
You can create the zip manually, or use the provided build script from the Ocelescope template by running at the project root:
Or if you are using uv:
The build script also checks for any absolute imports you may have missed and will raise an error if it finds them. After running the build, your plugin package will be created in the dist/ folder.