Tutorial OCEL Graph
This tutorial provides a general example for developing an Ocelescope plugin from scratch.
In this tutorial, we will build an OCEL Graph inspired by the OCELGraph feature of the OCPQ tool.
An OCEL graph visualizes how objects and events are related to each other. The plugin lets you choose an object or event ID as the starting point (the root), and then builds a spanning tree from that root based on the connected relationships in the ocel. You can also set how far the graph should expand from the starting point.
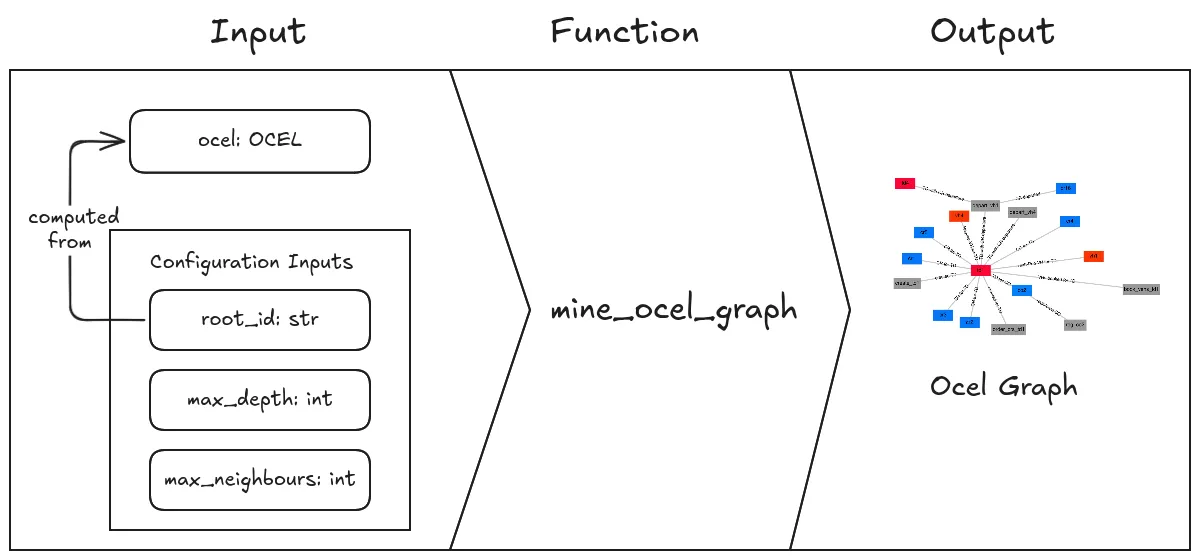
The input of the OCEL Graph
The output of the OCEL Graph
Step 1: Setup
Section titled “Step 1: Setup”To get started, use the plugin template. Clone it like this:
git clone https://github.com/promi4s/plugin-template.gitcd plugin-templateNow install the dependencies:
uv syncIf you do not want to use uv, you can use any other Python package manager. For example, with pip you can run:
pip install -r requirements.txtAfter that, your project should look similar to this:
plugin-template/├── src/│ └── plugin-template/│ ├── __init__.py│ └── plugin.py├── LICENSE├── README.md├── pyproject.toml├── requirements.txt└── uv.lockThe template is a minimal example. Most of your work will happen in plugin.py.
Step 2: Writing the Plugin
Section titled “Step 2: Writing the Plugin”Now we start writing the actual plugin.
Writing Plugin Metadata
Section titled “Writing Plugin Metadata”An Ocelescope plugin is defined by a plugin class. This class inherits from Plugin and contains your plugin methods.
Open src/plugin-template/plugin.py, find the existing plugin class, and update the class name and metadata to something like this:
from ocelescope import Plugin

class OcelGraphDiscovery(Plugin): label = "OCEL Graph" description = "Generate your own OCEL Graph" version = "0.1.0"- The class name (
OcelGraphDiscovery) is the unique name of your plugin and helps distinguish it from other plugins. - The label is what will be shown in the UI.
- The description briefly explains what your plugin does.
- The version lets you update your plugin over time.
Adding a Plugin Method
Section titled “Adding a Plugin Method”Now let’s add the function that will generate the OCEL Graph.
Add a new method to your plugin class called mine_ocel_graph. You mark plugin methods with @plugin_method. The label and description you set there will be shown in the UI.
from ocelescope import Plugin, plugin_method

class OcelGraphDiscovery(Plugin):    ...
    @plugin_method(label="Mine OCEL Graph", description="Mines an OCEL Graph")    def mine_ocel_graph(self):        pass
Planning a Plugin Method
Section titled “Planning a Plugin Method”Before you implement the method, it helps to plan what it should take as input and what it should return.
For our OCEL Graph plugin, we need the following inputs:
ocel: the OCEL to analyzeroot_id: the root of the graph (this can be an object ID or an event ID from the log)max_depth: how far the graph should expand from the rootmax_neighbours: how many neighbours to include per node (so the graph does not become too large)
As output, the method should return the OCEL graph.
In Ocelescope, plugin methods can only return either an OCEL or a Resource.
So we will implement the OCEL Graph as a custom Resource and return that.
Adding an OCEL Input
Section titled “Adding an OCEL Input”Since we want to build an OCEL Graph, our method needs an OCEL as input.
You can add it by adding an ocel: OCEL parameter to mine_ocel_graph:
from ocelescope import OCELfrom ocelescope import Plugin, plugin_method

class OcelGraphDiscovery(Plugin):    ...
    @plugin_method(label="Mine OCEL Graph", description="Mines an OCEL Graph")    def mine_ocel_graph(self, ocel: OCEL):        pass
To make this input nicer in the UI, you can add a label and description with OCELAnnotation.
For that, wrap the type using Annotated[...]:
from typing import Annotated
from ocelescope import OCEL, OCELAnnotationfrom ocelescope import Plugin, plugin_method

class OcelGraphDiscovery(Plugin):    ...
    @plugin_method(label="Mine OCEL Graph", description="Mines an OCEL Graph")    def mine_ocel_graph(        self,        ocel: Annotated[            OCEL,            OCELAnnotation(                label="Event Log",                description="The log from which the OCEL graph should be mined",            ),        ],    ):        pass
Now users will see a friendly label and description when selecting the OCEL input in the UI.
Adding a Configuration Input
Section titled “Adding a Configuration Input”Now we add the remaining settings (root_id, max_depth, max_neighbours).
For that, we create a configuration input class.
Create a new file called input.py next to plugin.py. In it, create a class called OCELGraphInput that inherits from PluginInput:
from ocelescope import PluginInput

class OCELGraphInput(PluginInput):    pass
Now extend OCELGraphInput with two numeric settings:
- the maximum depth of the OCEL graph
- the maximum number of neighbours per node
Use Pydantic’s Field to set titles, descriptions, defaults, and constraints:
from ocelescope import PluginInputfrom pydantic import Field

class OCELGraphInput(PluginInput, frozen=True):    depth: int = Field(        title="OCEL Graph Depth",        description="The maximum depth of the OCEL graph",        default=3,        gt=0,        le=10,    )
    max_neighbours: int = Field(        title="Maximum Neighbours",        description="The maximum amount of neighbours a node can have",        default=5,        gt=0,    )
Next, we need a way for users to select the root of the graph.
The root can be either:
- an object ID, or
- an event ID
To let users select the root, we define two small input models:
ObjectRootfor selecting an object by its IDEventRootfor selecting an event by its ID
Both models use OCEL_FIELD.
This links the field to the selected OCEL log, so the UI can offer autocomplete and validation.
from pydantic import BaseModelfrom ocelescope import OCEL_FIELD

class ObjectRoot(BaseModel):    class Config:        title = "Object"  # Better readability in UI
    object_id: str = OCEL_FIELD(        field_type="object_id",        title="Object ID",        ocel_id="ocel",        description="The ID of the object that should be used as the root of the OCEL Graph",    )

class EventRoot(BaseModel):    class Config:        title = "Event"  # Better readability in UI
    event_id: str = OCEL_FIELD(        field_type="event_id",        title="Event ID",        ocel_id="ocel",        description="The ID of the event that should be used as the root of the OCEL Graph",    )
Now combine both options in OCELGraphInput using a union type (ObjectRoot | EventRoot):
from ocelescope import PluginInputfrom pydantic import Field
class OCELGraphInput(PluginInput, frozen=True): root: ObjectRoot | EventRoot
depth: int = Field( title="OCEL Graph Depth", description="The maximum depth of the OCEL graph", default=3, gt=0, le=10, )
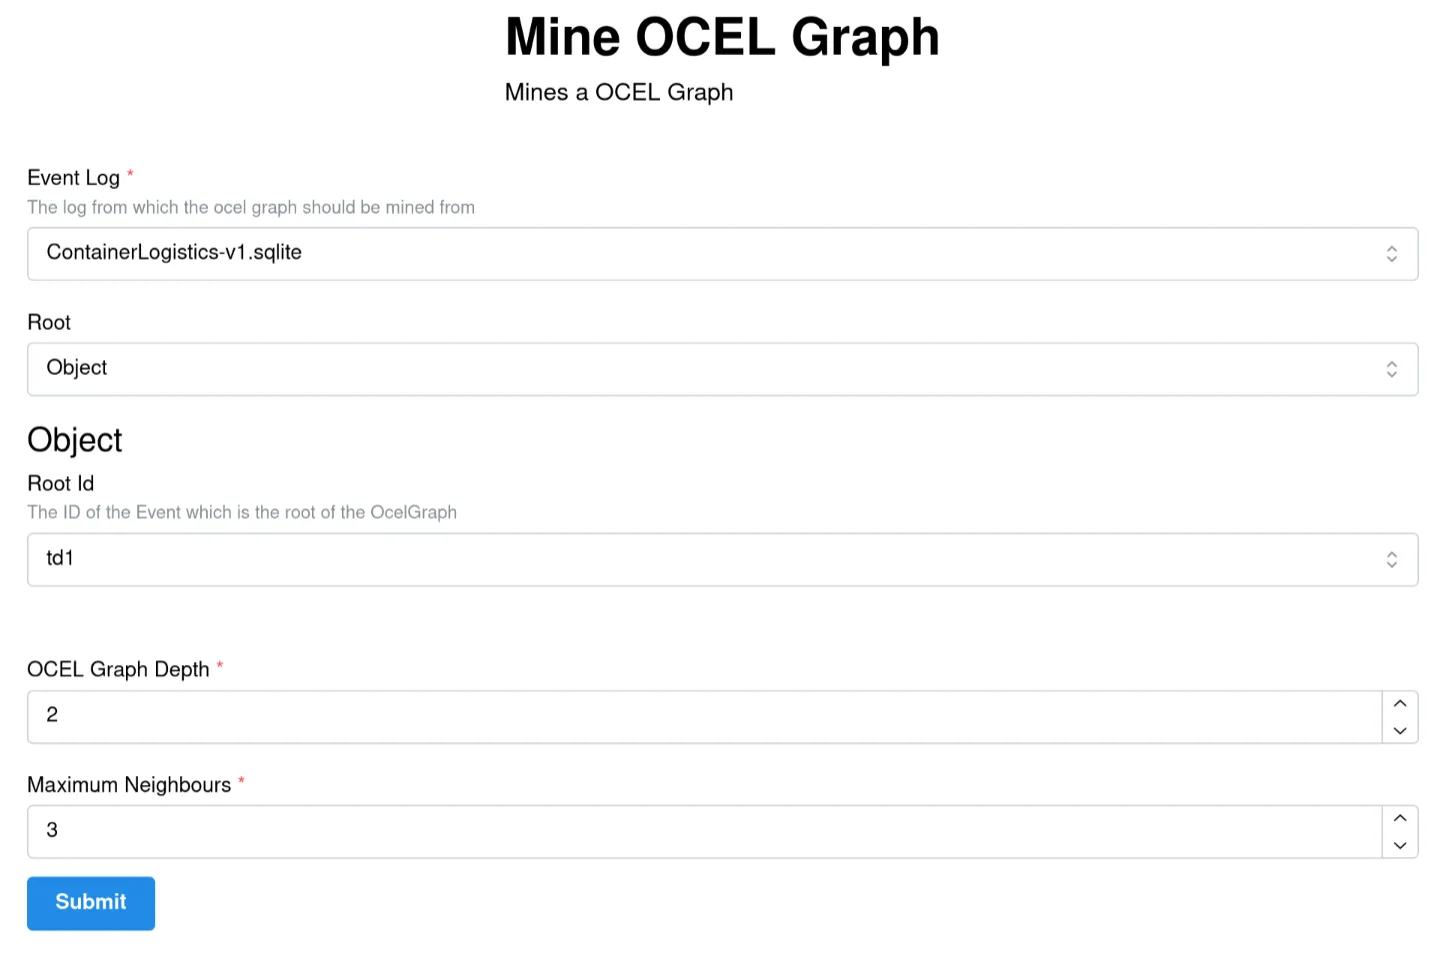
max_neighbours: int = Field( title="Maximum Neighbours", description="The maximum amount of neighbours a node can have", default=5, gt=0, )This will create an input form like this:
Adding the Configuration Input to the plugin method
Section titled “Adding the Configuration Input to the plugin method”Now we can use OCELGraphInput as the configuration input for our plugin method.
Import the input class and add it as a parameter named input:
from typing import Annotated
from ocelescope import OCEL, OCELAnnotation, Plugin, plugin_method
from .input import OCELGraphInput

class OcelGraphDiscovery(Plugin):    ...
@plugin_method(label="Mine OCEL Graph", description="Mines an OCEL Graph") def mine_ocel_graph( self, ocel: Annotated[ OCEL, OCELAnnotation( label="Event Log", description="The log from which the OCEL graph should be mined", ), ], input: OCELGraphInput, ): ...Defining a Resource
Section titled “Defining a Resource”Now that we have the inputs, we can define the output.
Our plugin should return an OCEL Graph. In Ocelescope, custom outputs are implemented as resources.
A resource is a Python class that inherits from Resource.
Create a new file called resource.py next to plugin.py and define the resource like this:
from pydantic import BaseModelfrom ocelescope import Resource

class EventNode(BaseModel):    id: str    activity: str

class ObjectNode(BaseModel):    id: str    object_type: str

class Relation(BaseModel):    qualifier: str    source: str    target: str    object_type: str | None = None

class OCELGraph(Resource):    label = "OCEL Graph"    description = "An OCEL graph"
events: list[EventNode] = [] objects: list[ObjectNode] = [] relations: list[Relation] = []You can also add helper properties or methods to your resource. For example:
class OCELGraph(Resource):    ...
    @property    def event_ids(self) -> list[str]:        return [event.id for event in self.events]
    @property    def object_ids(self) -> list[str]:        return [obj.id for obj in self.objects]
Finally, make sure your plugin method returns your resource by adding it as the return type:
from .resource import OCELGraph

class OcelGraphDiscovery(Plugin):    ...
    def mine_ocel_graph(...) -> OCELGraph:        ...
Visualization
Section titled “Visualization”At this point, OCELGraph can already be returned as a resource.
But it is only a data structure. By default, it has no visualization in the frontend.
To visualize the resource in Ocelescope, add a visualize() method.
This method returns one of Ocelescope’s visualization objects, for example Graph.
Add this to your OCELGraph class:
from ocelescope.visualization.default.graph import ( Graph, GraphEdge, GraphNode, GraphvizLayoutConfig,)from ocelescope.visualization.util.color import generate_color_map
class OCELGraph(Resource): ...
def visualize(self) -> Graph: color_map = generate_color_map( list(set([obj.object_type for obj in self.objects])) )
object_nodes = [ GraphNode( id=obj.id, shape="rectangle", label=obj.id, color=color_map[obj.object_type], ) for obj in self.objects ]
event_nodes = [ GraphNode( id=event.id, shape="rectangle", label=event.id, ) for event in self.events ]
edges = [ GraphEdge( source=rel.source, target=rel.target, label=rel.qualifier, color=color_map[rel.object_type] if rel.object_type else None, ) for rel in self.relations ]
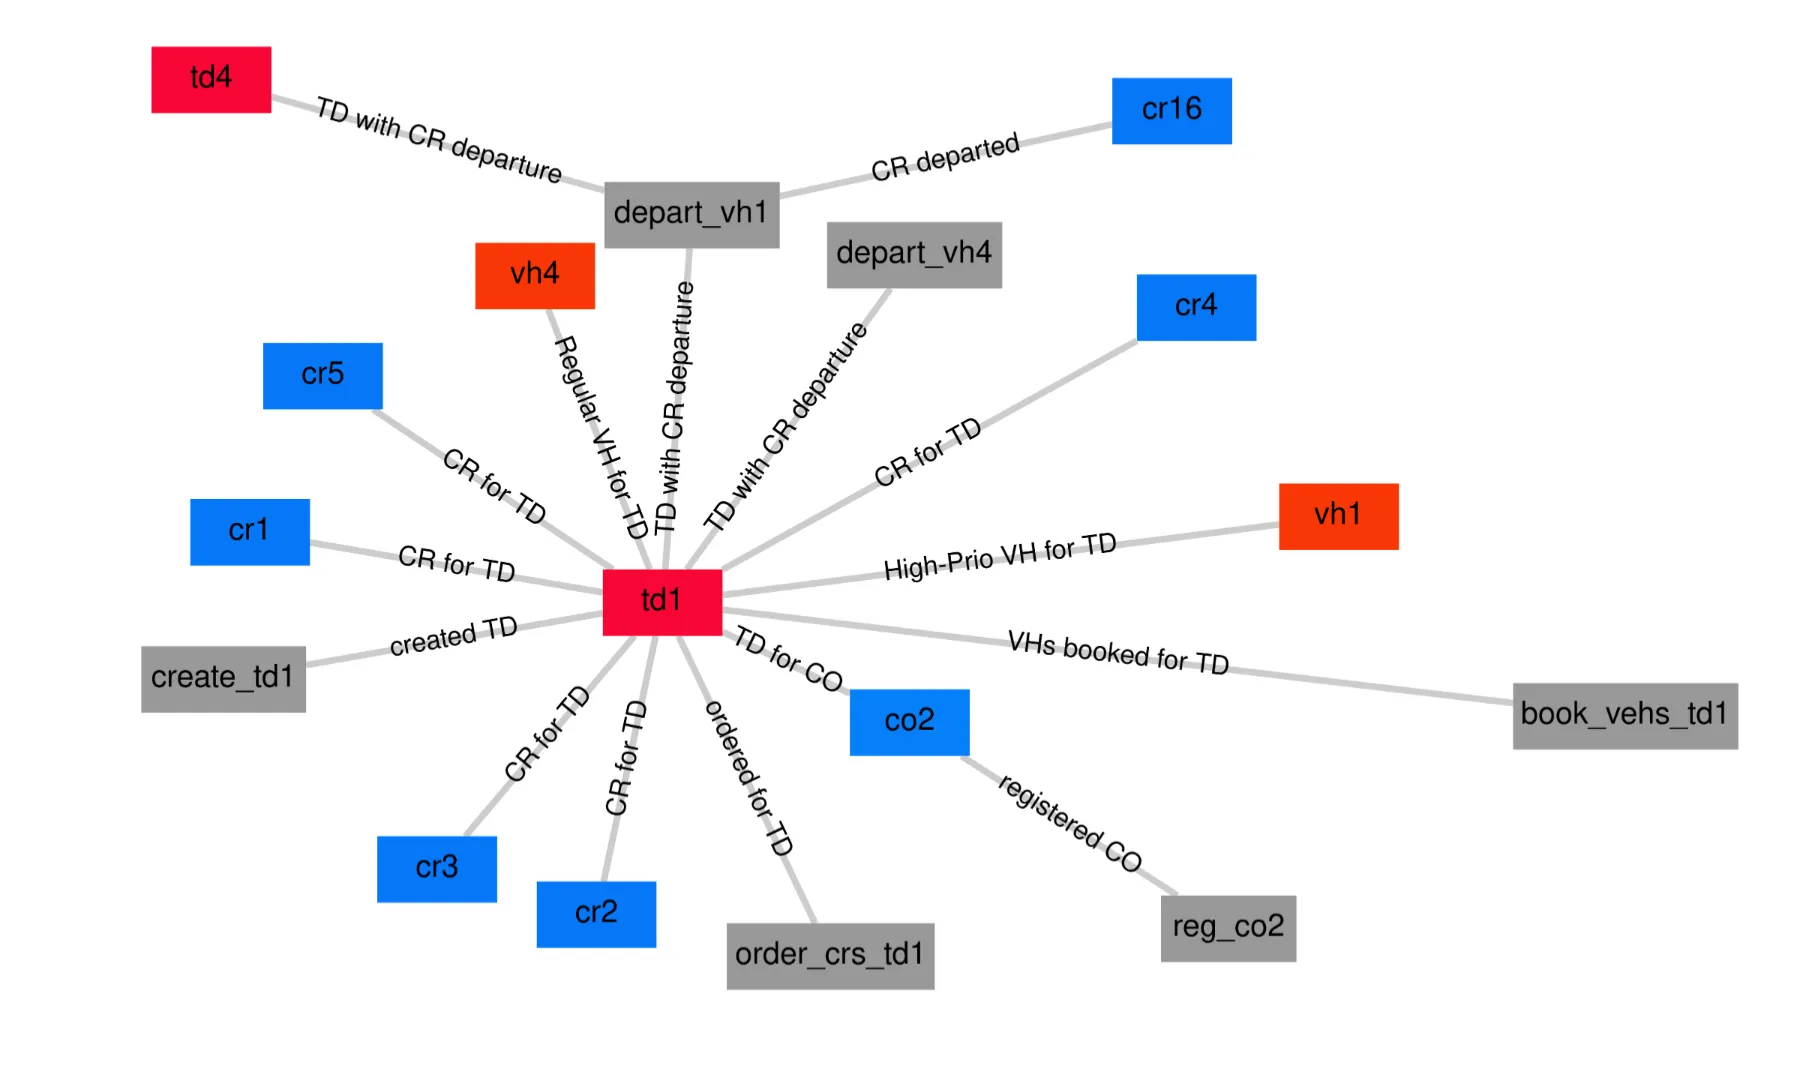
return Graph( type="graph", nodes=object_nodes + event_nodes, edges=edges, layout_config=GraphvizLayoutConfig( engine="neato", graphAttrs={"overlap": "prism"}, ), )Now your resource will show up as an interactive graph in the frontend:
Implementing the Plugin Method
Section titled “Implementing the Plugin Method”Now you can implement the plugin method that transforms your input (the OCEL and configuration) and returns your resource.
For this tutorial, we won’t go into the implementation details.
Instead, we will put the logic in a utility function to keep plugin.py clean and readable.
Download util.py and add it next to plugin.py:
src/plugin-template/├── plugin.py└── util.pyNow import the function and return its result:
from ocelescope import OCEL, Plugin, plugin_method
from .input import OCELGraphInputfrom .resource import OCELGraphfrom .util import mine_ocel_graph

class OcelGraphDiscovery(Plugin):    ...
@plugin_method(label="Mine OCEL Graph", description="Mines an OCEL Graph") def mine_ocel_graph(self, ocel: OCEL, input: OCELGraphInput) -> OCELGraph: return mine_ocel_graph(ocel, input)Step 3: Build Plugin
Section titled “Step 3: Build Plugin”Before you build the plugin, make sure your package exposes the plugin class at the top level.
Open src/plugin-template/__init__.py and export your plugin class:
from .plugin import OcelGraphDiscovery
__all__ = [    "OcelGraphDiscovery",]
Ocelescope plugins are distributed as a zipped Python package. After building, your zip should look like this:
plugin.zip/├─ ocel_graph/│ ├─ __init__.py│ ├─ plugin.py│ ├─ util.py│ ├─ input.py│ ├─ resource.pyYou can create the zip manually, but it is easier to use the build command.
Run this from the project root:
ocelescope buildOr, if you are using uv:
uv run ocelescope buildThe build script also checks for absolute imports and raises an error if it finds any.
That’s it. You can now upload the zip from dist/ to an Ocelescope instance and run your plugin.